

Welcome to our first blog
Welcome everyone to TCET Open Source's Blog Section. Here, we promote blogging in the student community. Talk about ongoing trends in tech, student life at TCET, and any topic you feel would feel great for this blog.
This particular blog will have recurring adjustments. Last revised on Oct 1st, 2023.
General Blog Guidlines
Here we define all the basic guidlines a blog should follow in TCET Open Source Blogs.
Clone the project
For being able to contribute anywhere, one must be able to clone and run projects. You can visit this tutorial to learn how to work on this project.
Basic GitHub commands
For any contributor it is very necessary to understand basic GitHub commands to begin with. There is a resources forum on TCET - Open Source Discord server where you can find relevant references for the same. There can also be a blog post regarding these commands in the future!
Understand file structure
Once you have cloned the project in your local storage, you will need to perform the following:
- Open the project directory and navigate to
blog/. - Create a folder for your blog post.
- The folder should have the following name format:
yyyy-mm-dd-blog-title
- Here, the date stands for the date when the post is supposed to be released. The blog title should be relevant to the content within the post.
- Within the folder, create
index.mdx. This file will serve as a text document where you can format your content which will reflect in the final post.
Understand markdown files and syntax
Markdown is a lightweight markup language that you can use to add formatting elements to plaintext text documents. The index.mdx file created in your blog folder is a markdown file, similar to how index.html can be an HTML file. It is very essential for a blog contributor to understand the basic syntax of markdown. Resource forum in our Discord server covers basic syntax of these files.
First steps
Before moving any further, a blogger must know the following:
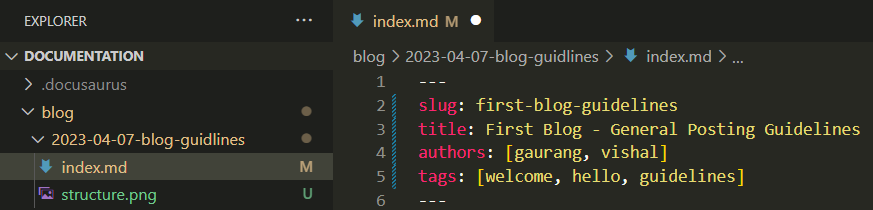
slug- It is the last part of the URL address that serves as a unique identifier of the blog post.title- The main title of the blog post. Note that the blog title should be relevant to the content within the post.authors- The list of authors who have worked on the blog post. Look below to understand how to add authors.tags- It highlights the key words of the post to boost it's visibility on the internet and improve the SEO.
These four information are necessary to be present in every post. Without these, no posts will be approved and merged within the blog.
Authors can be added in two ways.
- Internally in
index.mdx(recommended, for outside organization contributors) - In the
authors.ymlfile. (TCET Open Source Members only)
If you are not a member of the organization, you can simply append your author(s) in the following way:
authors:
  - name: Name of Author 1
    title: Designation, Post or About
    url: https://github.com/author1
    image_url: https://github.com/author1.png
  - name: Name of Author 2
    title: Designation, Post or About
    url: https://github.com/author1
    image_url: https://github.com/author2.png
Important things to take note of:
url:can also be an authors' personal website or portfolio.image_url:requires a user to have a profile pic on their Github Account. We recommend to append a Github Profile Icon.
Adding images
Tired of good ol' textbook nerdy look on your post? Introducing: images. Images are a great way to keep the reader's attention to your posts, and now you can do that very easily:
- The image must be present within your blog folder. If it isn't, save the image in your blog folder.
- To add the image within your post, use the following syntax:

- Here,
image.pngstands for the name of the image you have in the blog directory. Markdown supports a great amount of image formats, ranging from png, jpg, svg, and even gifs.
Is gif pronounced gif or jif? Something to ponder upon.
Utilizing truncate
Many bloggers have many different ways to write their blogs. Many start off with a nice paragraph, some start off with images, and some do both! All blogging practices are welcome in the Organization. However it is important to truncate.
Truncate is a custom breakpoint introduced in the blog to identify how much part of the blog should be visible in the feed. It cuts off the rest of the blog which can be read further by opening the blog itself. Here's a good example of how to use it:
Hello and welcome to my blogpost.
Today we will be covering everything you can imagine!
JAM Stack, Web3, ML, Data Science, my favourite food, Cybersecurity, and much more.
Sounds like a hefty lot, and it would be embarassing to flood out the entire blogs feed.
This might be a decent place to cut the rest of the blog out!

<!--truncate-->

Here's where the rest of the blog content goes
Hence in the output, only the above paragraph is visible on the feed. The rest of the blog would be visible once the viewer opens your blog.
Congratulations
Following these steps and points, you will be able to create a beautiful blog post. It's final structure would look something like this:
With a fresh blog post ready, you can now finally create a pull request to reflect your post on our blog here!
Looking forward to new content from you all. Have fun and go contribute something great!